Monday, 8 December 2008

Retro 1950s Look: Diana Dors?

Naomi as Diana Dors
Naomi is, unsurprisingly as you'll see from these images, often told on the street that she looks like the late British film actress, Diana Dors. So she went with the flow and got the clothes and accessories and now can really look the part. She hopes to do some lookalike promotional work but actually just likes being glamorous in an old school kind of way.

I wanted to try out a chiaroscuro lighting set-up with two flashes to recreate that 1940s/50s starlet look and Naomi was the perfect muse for the look I wanted to get.

Two flash set up: Vivitar 285HV, camera right as main light at 1/32 with 1/8 grid fitted, and snooted Canon 580EX at 1/32 acting as a hair light behind and left of model. Both on Manfrotto nano stands. Honl lighting modifiers. Taken at f/6.3 to kill ambient light of the living room lights with curtains closed behind to block daylight.

Post-production: Colour master taken to monochrome. Minor skin retouching. Grain added. Lens blur vignette to recreate poorer quality older lens. All in Photoshop CS3.

Monday, 1 December 2008

Lighting102 1.2 - Position | Distance

Strobist102 1.2 - Position | Distance

So onto part II of the first section of Lighting102; varying the distance the flash is to the subject, and the distance the subject is to the background. The two distances make an important ratio. More of that in a second. In this triptych Fred is almost exactly 1m in front of my living room wall in each shot. I've varied the distance the flash is from him (slightly camera right as you can see by the shadows).

Feel free to click on the image to go to my flickr profile and see a larger version.

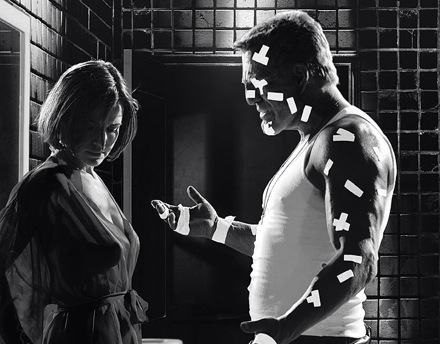
So the background is obviously more lit at 1m and at 3m because the power of the flash is higher to compensate for the distance to the subject (to get a consistent exposure of Fred). Somehow without planning it I've demonstrated the 'inverse square law' - double the distance and you get four times the light fall off. In our case doubling the distance to Fred to 1m (from 0.5m) means the power of the light has to go up two stops from 1/128 to 1/32(1 stop is doubling its output). Tripling the distance to Fred from 1m to 3m results in a 3 stop increase from 1/32 to 1/4 to get a consistently OK exposure. I was doing this by eye, by the way. No flash meters were harmed in the making of these images.

I've also noticed something else. Look how much more even the light is from a bare bulb flash at 3m than at 0.5m. Look at the shadows on Fred's face. I might use that one day if I get caught shooting without any umbrellas or material to soften the light from my flashes.

Anyway I know the maths is hurting you but one last set of numbers. The ratios worked out flash to subject/subject to background are as follows:

Left - very dark background - 0.5m/1m= 1/2
Middle - medium grey (in mono) - 1m/1m = 1
Right image - light background - 3m/1m = 3

Those ratios will work (because they are ratios) wherever and whenever I next shoot so I'm going to try to keep them in my head. Might also try to work out my average stride length to estimate distances over a few metres in case I set up with big spaces between subject, flashes, and background. Though I doubt my flashes with cheap cactus v2s radio triggers are going to work over very long distances anyway.

Sunday, 30 November 2008

HONL Speedlight Modifiers

If you've not seen these yet do check out the video just posted by Practical Photography magazine on their video tutorial website.

The great news is that in the UK, Flaghead are now officially distributing them on behalf of HONL, so those of us in the UK won't have to import them anymore and incur shipping fees (although the exchange rate with the dollar ain't so great right now).

Its not an advert for them, but was so inspiring that I'm going to try to pick up some online from Calumet later in the week.

Post Script - Calumet have run out of the speed straps today (1st December 2008) (they are the velcro things that go around your flash and attach the various modifiers to it). So I've ordered some from Robert White instead. Between them they are currently the only UK retail distributors of HONL products.

Hard Rim Light : Sin City


Film noir (literally 'black film') is interesting me a lot since I started thinking about the lighting102 assignments. Its difficult to define exactly what makes a film film noir, but people seem to agree that since the classic golden age in the 1930s and 1940s the tradition continues. In terms of cinematography some hallmark characteristics are strong back lighting, with hard shadows. I like this light. I dug out my DVD copy of Robert Rodriguez's Sin City the other night and watched it again with an eye to the lighting. Ignore the CGI post-prodcution backgrounds and additions but just look at the placement of the lights in this image sample. Lots of shadows on the front (from the camera's perspective) but light coming in hard from left and right or behind. I really like this light. We'll be seeing more of this in later assignments, and in my personal work too.

Summary: Lighting102 1.1 - Position | Angle

I'm told by various people involved in adult education (sorry, life long learning) that reflection is integral to the learning process. So I fully intend after each assignment to sit down and think about what I've learned. Whether or not that actually happens remains to be seen of course.

I have been taking my flash(es) off camera for some time but I remember that it was a revelation when I first did it and compared the results to the sort of images I was getting when that flash was stuck to the top of the camera.

This time around I've been struck more by the fact that you can totally ignore the ambient light; ISO 100, set the shutter speed to close to the camera's max sync speed (1/200 for my 20D when I'm using cactus v2 radio triggers - the theoretical 1/250 doesn't work well) and a medium aperture (f10-11). It kills both my domestic ambient tungsten lighting and gloomy winter daylight stone cold dead. At those settings my flashes were working comfortably at around 1/16 - 1/32 power when they were unmodified, ungelled, and about 1-1.5m away from the subject. A good headshot or still life set up. Obviously I'd have to allow wider apertures for full body shots or environmental portraits when the flashes have to be further away, else their battery life would diminish rapidly. But the point is I have control over how much ambient light to start with. I know I'll come back to that subject in later assignments.

On a related theme I tried setting the camera's white balance to flash - with the ambient light not a feature the WB was well balanced on that setting. Its only the ambient light/flash light mix that you start to worry about colour balancing and using gels. I turned all the images here to black and white in Aperture software to concentrate on the directional lighting but the original colour images were ok - a nice white light on that WB setting.

Tuesday, 25 November 2008

Lighting102 1.1 Position | Angle - Excerpt

An excerpt from my attempt at the Strobist lighting 102 assignment 1.1 - Position | Angle.

The rest of the set is here.

A whole load of images from this assignment plus background and set up information on my flickr photostream here

Monday, 24 November 2008

Lighting102: 1.1 - Position | Angle


I've started my journey through the lighting102 course, appropriately I thought, at assignment 1.1.

Meet Fred. Or Mr Polystyrene to you (for that is what the label said on the box when it arrived from the ebay seller to my front door). He's my new muse. Patient. Reliable. And no back chat.

This is the start of my Strobist Lighting102 journey and Fred will be traveling with me most of the way. Its much quicker working with him than doing self portraits and he has a pretty consistent reflective relationship with light which might help with comparisons later on. I've chosen for this assignment to keep things black and white at this stage because we aren't concerned with colour just the angle of the light. I like things simple me.

This image shows on camera flash of course.

Some information about the set up for this and the rest of the series on 1.1 Position - Angle:

- Canon 20D with 24-70mm f/2.8 lens set at 50mm focal length about 1m away from our subject. Hand held. Shutter speed of 1/200 to get close to max sync speed and an aperture of f11 to kill the ambient lighting. ISO 200
- Ambient lighting of single tungsten bulb. Correct exposure with no flash at ISO200 was 1/8 f/2.8
- Fred is about 0.7 metres in front of the wall behind
- Vivitar 285HV on Manfrotto Nano stand set at 1/16 power and consistently at 1m distance from our subject
- Cactus v2s trigger

Lighting 102 1.1 Assignment here: strobist.blogspot.com/2007/06/lighting-102-unit-11-positi...

Lighting102

A very early new year's resolution. Time to get back to basics and learn something for a change. So I'm going to work my way through the strobist lighting102 course to get this lighting trickery into my head once and for all.

Saturday, 8 November 2008

Year Zero


no:more:saviours

Year Zero begins 01.01.2009

More information coming soon.

Same old propaganda at www.nomoresaviours.com

Johnny